What do the HP LaserJet Pro M14-M17 printer flashing lights mean?
This information provided by https://support.hp.com is for HP LaserJet Pro M15a, M15w, M16a, M17a, and M17w printers.
Click here to see our latest toner deals for M14-M17 printer.
The following sections describe error conditions with blinking (flashing) lights displayed on the HP LaserJet Pro M14-M17 printer control panel, followed by solutions for each error. Find the blinking light pattern that displays on the control panel, and then follow the steps to resolve the issue.
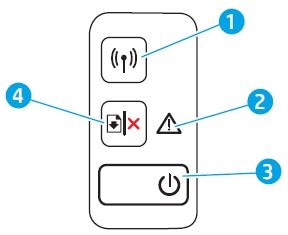
- Wireless button and light
- Attention light
- Power button and light
- Resume/Cancel button
Attention light blinks
The Attention light blinks when the printer is in an error state.
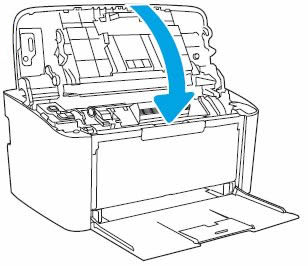
Attention light blinks, and 'Front Door Open' displays
This condition occurs when the toner cartridge access door is open or not closed completely. To resolve the error, open the toner cartridge access door, and then close it completely.
Attention light blinks, and 'Out of Paper' displays
This condition occurs when the input tray is empty. To resolve the error, load paper into the input tray.
Attention light blinks, and a paper jam message displays
This condition occurs when paper is jammed inside the printer. One of the following messages might display on the computer screen:
- Printer paper jam
- Paper Jam in Tray
- Paper Jam in Output Tray
Find and clear the printer of any jammed paper, or reset the printer if the printer has no jammed paper. For more information about resolving paper jam issues, go to Paper Jam Error.
Attention light blinks, and 'Toner Missing' or 'Supply memory error' displays
This condition occurs when the toner cartridge is missing or not installed correctly. To resolve the issue, correctly install the toner cartridge.
Step 1: Examine the toner cartridge area
Open the toner cartridge access door, and then make sure the toner cartridge is installed correctly. Remove the toner cartridge, and then slide it back into its slot until it is firmly seated.
For more information about removing and installing the toner cartridge, go to Replacing the Toner Cartridge.
Try to print. If the issue persists, continue to the next step.
Step 2: Service the printer
If you have completed all the previous steps and the issue persists, continue to the Service the printer section at the end of this document.
Attention light blinks, and 'Cartridge Low' displays
This condition occurs when the toner cartridge is low. Press the Resume/Cancel button to continue printing with the current toner cartridge. If print quality is unacceptable, replace the toner cartridge.
NOTE: You do not need to replace the toner cartridge until print quality is unacceptable.
Step 1: Replace the low toner cartridge
Replace the toner cartridge with a new toner cartridge.
For more information about replacing the toner cartridge, go to Replacing the Toner Cartridge.
Try to print. If the issue persists, continue to the next step.
Step 2: Service the printer
If you have completed all the previous steps and the issue persists, continue to the Service the printer section at the end of this document.
Attention light blinks, and 'Cartridge Very Low' displays
This condition occurs when the toner cartridge is very low. Press the Resume/Cancel button to continue printing with the current toner cartridge. When print quality becomes unacceptable, replace the toner cartridge.
Step 1: Replace the low toner cartridge
Replace the toner cartridge with a new toner cartridge.
For more information about replacing the toner cartridge, go to Replacing the Toner Cartridge.
Try to print. If the issue persists, continue to the next step.
Step 2: Service the printer
If you have completed all the previous steps and the issue persists, continue to the Service the printer section at the end of this document.
Attention light blinks, and 'HP Protected Cartridge Installed' displays
This condition occurs when the toner cartridge has been protected on another printer. To resolve the issue, replace the toner cartridge.
Step 1: Replace the low toner cartridge
Replace the toner cartridge with a new toner cartridge.
For more information about replacing the toner cartridge, go to Replacing the Toner Cartridge.
Try to print. If the issue persists, continue to the next step.
Step 2: Service the printer
If you have completed all the previous steps and the issue persists, continue to the Service the printer section at the end of this document.
Attention light blinks, and 'Incompatible Cartridge' displays
This condition occurs when the toner cartridge is not compatible with the printer. To resolve the issue, replace the toner cartridge.
Step 1: Replace the low toner cartridge
Replace the toner cartridge with a new toner cartridge.
For more information about replacing the toner cartridge, go to Replacing the Toner Cartridge.
Try to print. If the issue persists, continue to the next step.
Step 2: Service the printer
If you have completed all the previous steps and the issue persists, continue to the Service the printer section at the end of this document.
Attention light blinks, and 'Paper Size Mismatch' displays
This condition occurs when the paper loaded in the input tray is not the correct size for the print job. To resolve the error, load the correct size paper in the input tray, or change the print settings to match the paper type loaded in the tray.
Attention light blinks, and 'Print on Both Sides Instructions' displays
This condition occurs when the printer is processing a manual duplexing (two-sided) print job and cannot complete the print job until the input tray is loaded.
To finish the print job, remove the stack of printed pages from the output tray, and then load the stack with the printed side down and the top edge of the stack toward the printer. Press the Resume/Cancel button to print the second sides.
Wireless light blinks
The Wireless light blinks when a connection is configuring or when the printer cannot find a wireless signal or cannot connect to the network.
Step 1: Wait for the printer to establish a connection
The Wireless light blinks when the printer is attempting to connect to the wireless router or access point. Wait a few minutes, and then check the light again.
- If the Wireless light is on and steady, the printer is connected and you can stop troubleshooting.
- If the Wireless light is still blinking, continue to the next step.
Step 2: Check for issues with the wireless network
The following factors can cause the printer to lose the wireless connection:
- The network connection is no longer active, or has low signal strength.
- The printer goes into sleep mode or standby mode.
- The printer is either too far away from the wireless router, or too close to it. The recommended distance between the printer and the router is 1.0 meter to 1.5 meters (3 ft to 5 ft).
- A firewall prevents the printer from accessing the computer and wireless network.
- A nearby device that emits radio signals (such as a microwave or cordless telephone) might interfere with the wireless connection.
- A virtual private network (VPN) prevents the printer from accessing the computer and wireless network.
Check the Wireless light after correcting any items on the list.
- If the Wireless light is on and steady, the printer is connected and you can stop troubleshooting.
- If the Wireless light is still blinking, continue to the next step.
Step 3: Connect the printer to your network
For more information about connecting the printer to the wireless network by installing the printer software, see Wireless Printer Setup (Windows) or Wireless Printer Setup (Mac), depending on your operating system.
Attention and Ready lights are on
This condition occurs when the printer is in a fatal error state.
Step 1: Reset the printer
Reset the printer to clear the printer error.
- With the printer turned on, disconnect the power cord from the printer.
- Unplug the power cord from the power source.
- Wait 60 seconds.
- Reconnect the power cord to a wall outlet and to the printer.
Try to print. If the issue persists, continue to the next step.
Step 2: Plug the printer directly into an electrical outlet
Plug the printer directly into an electrical outlet to make sure the power source functions correctly.
- Unplug the power cord from any surge protector, extension cable, or power strip.
- Plug the power cord directly into a wall outlet.
- Turn on the printer.
Try to print. If the issue persists, continue to the next step.
Step 3: Service the printer
If you have completed all the previous steps and the issue persists, continue to the Service the printer section at the end of this document.
Attention and Ready lights blink
This condition occurs when the printer is too hot to continue printing. To resume printing, wait for the printer to cool down.
Service the printer
Service or replace your HP product if the issue persists after completing all the preceding steps.
Go to Contact HP Customer Support to schedule a product repair or replacement. If you are in Asia Pacific, you will be directed to a local service center in your area.
To confirm your warranty status, go to HP Product Warranty Check. Repair fees might apply for out-of-warranty products.
Leave a comment